Adding Person Contacts
When you add a contact using InterAction for Microsoft Outlook, the contact is added to both Outlook and InterAction simultaneously.
You can also use Outlook’s native new contact feature, such as choosing New Contact when viewing your Outlook contact list. In this case, the contact is added to InterAction when Microsoft Outlook to InterAction Sync occurs. Whether the contact is added to the Firm List depends on your default relationship settings for new contacts. See Relationship Settings for details.
When a contact is added to InterAction, a Knows relationship may be created. This is also based on your default relationship settings for new contacts.
See the following topics for more information on adding contacts using InterAction for Microsoft Outlook:
- Add a New Person Contact
- Checking for Duplicates
- Entering Contact Information for a Person
- Linking a Contact to a Company
Making Contacts Private
All contacts marked Private in Outlook are automatically added as private contacts in InterAction. Private contacts in your InterAction user contact list cannot be seen by your proxies. Similarly, you can configure Outlook to hide private contacts from your delegates.
Add a New Person Contact
There are three ways you can add a new person contact to Outlook using InterAction for Microsoft Outlook:
- Add a New Person Contact from an Outlook Item
- Add a New Person Contact from a Blank Entry Form
- Add a New Contact from an Activity
IMPORTANT Any new contact added to InterAction in IMO must meet the minimum required fields specified by the firm. Those required fields are indicated in the interface. You can create a new user contact with data in the minimum required fields and keep some of those fields (email address or phone number or both) confidential. If you wish to share the contact with the firm, however, the confidential data does not count as data in the required fields; the interface will indicate if data are missing from a field.
Add a New Person Contact from an Outlook Item
Adding a contact from an Outlook item (such as an email message) saves time because InterAction for Microsoft Outlook begins the process by using the information you already have.
For example, if you receive an email message from a new contact, InterAction for Microsoft Outlook can immediately search InterAction for possible matches in the system using the contact’s email address or name.
To add a new person contact from an Outlook item:
-
In Outlook, highlight or open the email message, meeting, contact, or task that includes the new contact.
-
Hover over or select any option from the InterAction Pane.
-
Choose the name of the new contact in the contact switcher at the top of the fly-out menu (seeCreating a New Contact from an InterAction Item).
-
If the person is not already in InterAction, choose Create New Contact or Next.
-
Continue adding the contact, using the following topics as a guide:
-
When you are finished adding the contact, choose Save & Close.
Creating a New Contact from an InterAction Item
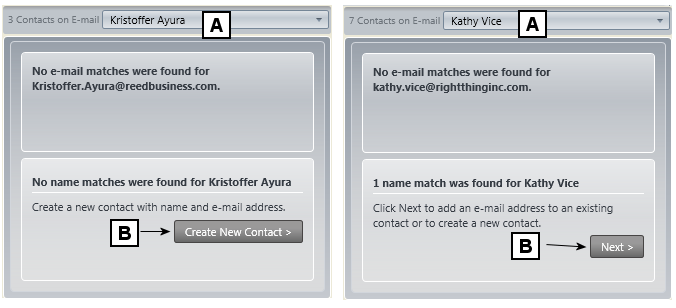
[A] The drop-down list lets you switch between contacts on the Outlook item. Select the contact from the Outlook item that you want to add.
[B] If the selected contact is not in InterAction, the Create New Contact or Next button displays, depending on whether possible matching information was found.
Add a New Person Contact from a Blank Entry Form
There may be scenarios when starting from a blank entry form makes sense when adding new contacts. For example, you may not have any Outlook items that include the contact, or you may have a stack of business cards in hand and just want to get them into the system.
To start from scratch when adding a contact:
-
Access a blank contact entry form by choosing either the New Person icon in Minimized view (
 ) or Normal view (
 ).
). -
Continue adding the contact, using the following topics as a guide:
-
When you are finished adding the contact, choose Save & Close.
Add a New Contact from an Activity
Activity contacts that are not in InterAction are listed in the Contact(s) not in InterAction section and designated with a plus icon ( ) in the activity.
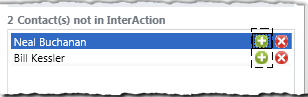
Contacts Not in InterAction
Choose the plus icon to create a new contact.
Continue adding the contact, using the following topics as a guide:
- Checking for Duplicates
- Sharing Contacts and Keeping Contacts Private
- Entering Contact Information for a Person
When you are finished adding the contact, choose Save & Close.
Checking for Duplicates
In many cases, the contact you want to create already exists in InterAction. Therefore, when you create a new contact, InterAction checks for any existing contacts that match the one you are creating. This helps keep duplicates out of InterAction and saves you time when creating new contacts.
If you are creating a contact from an Outlook item (such as an email message), InterAction can check for duplicates on the fly. For example, while viewing an email from a new contact, you hover over Business Card to see if the contact is InterAction. A duplicate check is done at that time, while InterAction for Microsoft Outlook attempts to find the contact in InterAction.
When there are multiple recipients on the email, IMO provides a drop-down so you can select any one to compare individually.
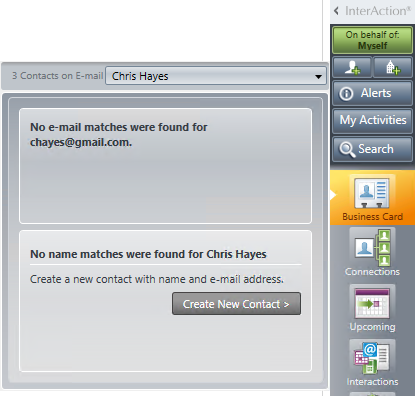
Duplicate Check in Outlook
In this example, InterAction did not find an email match for the contact named Chris Hayes or the email. As a result, IMO offers the option to Create New Contact.
If InterAction does find possible name matches you can choose Next to view the list of potential matches and add a contact if needed. When InterAction does not find an email or name match, the button reads Create New Contact.
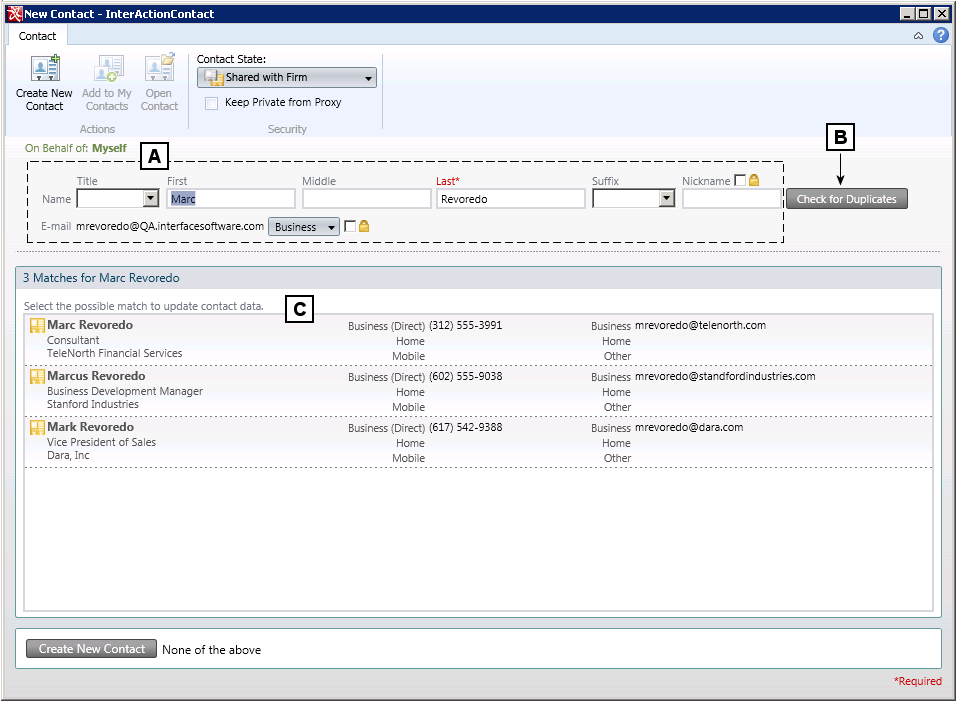
New Contact: Checking for Duplicates
[A] The contact’s name information used for the duplicate check.
If you started from an Outlook item, InterAction for Microsoft Outlook populates these fields for you with the information you already have on the Outlook item. If you started from an email message, the contact’s email address is also used when checking for duplicates.
If you are creating a new contact from scratch, type all the name information that you have for the contact.
[B] If you are creating a new contact from scratch, choose Check for Duplicates to search for possible matches.
If you started from an Outlook item, InterAction for Microsoft Outlook displays possible matches upon accessing this page, so choosing the Check for Duplicates button is not necessary.
[C] The list of possible matches.
When adding a contact from a blank entry form (you are not starting with an Outlook item, such as an email), InterAction for Microsoft Outlook takes you to the New Contact page so you can perform a manual duplicate check. To manually check for duplicates, type the contact’s name in the name fields, then either hit the Enter key or choose Check for Duplicates.
If the New Contact Does Not Exist in InterAction for Microsoft Outlook
If InterAction does not find any matches for the new contact, or you know the contact you want to create is not in the list, then create a new contact by choosing Create New Contact in the ribbon or at the bottom of the page.
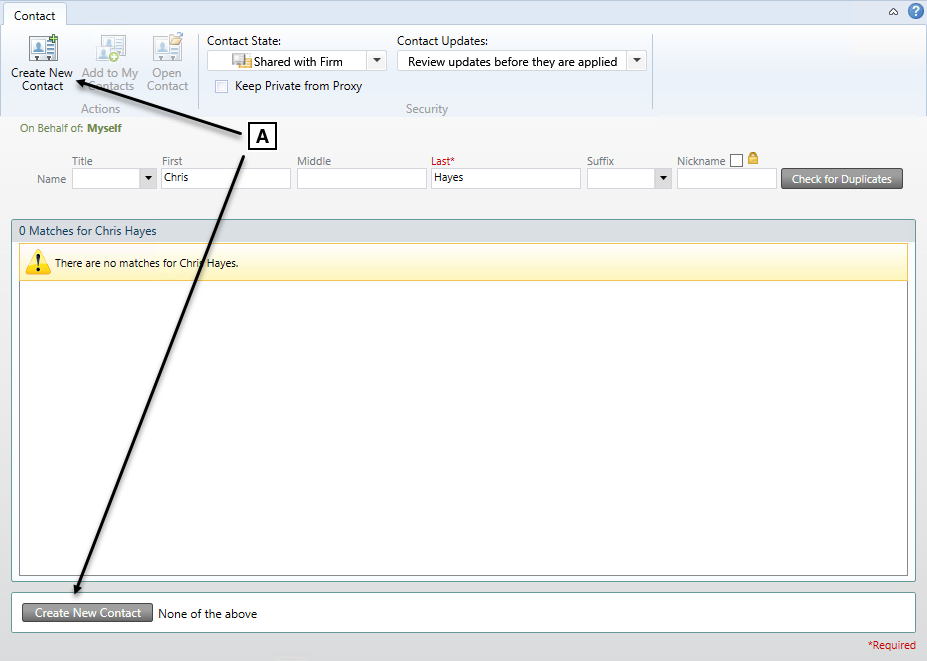
Create New Contact
[A] If any of the listed matches are not the contact you are trying to create, choose Create New Contact in the ribbon or at the bottom of the page.
InterAction for Microsoft Outlook opens the contact entry form, where you can add the person’s contact information. For more information, see Entering Contact Information for a Person.
If the New Contact is a Duplicate
If one of the listed matches is the contact you intended to create, select the matching contact in the list. You can then add the contact to your contact list as-is and complete the add contact process, or you can update the contact.
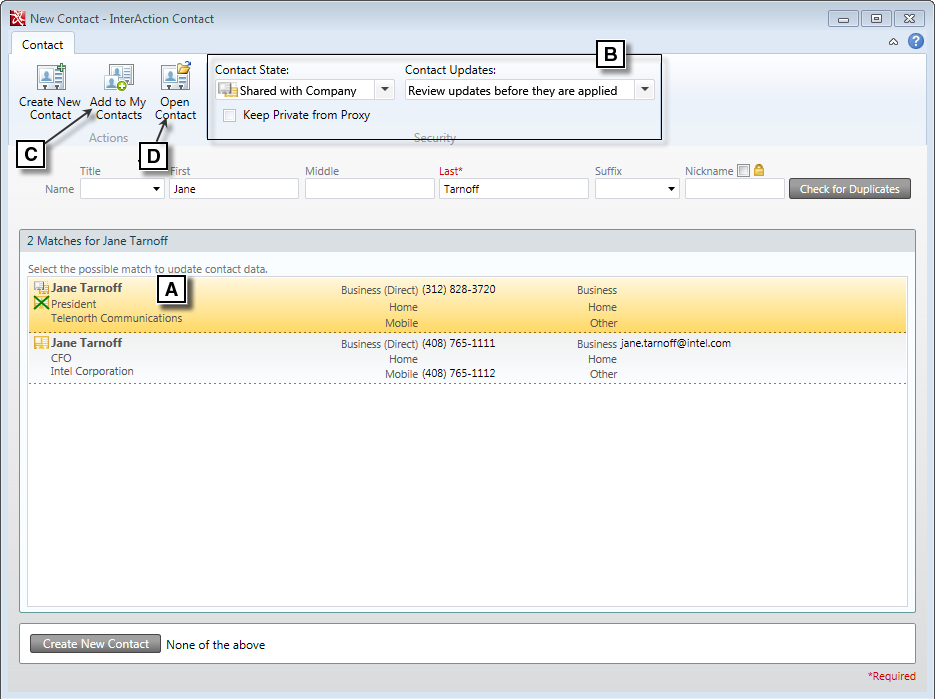
Selecting a Duplicate Contact
[A] If a listed contact is the contact you are trying to create, select it.
After you select the contact, InterAction for Microsoft Outlook updates the contact if new information is available from the Outlook item. See Why is InterAction for Microsoft Outlook Crossing Out the Contact's Information? for more information.
[B] Specify the security settings for the contact.
See Sharing Contacts and Keeping Contacts Private for more information.
[C] To add the selected contact to your contact list as shown and complete the add contact process, choose Add to My Contacts. The New Contact page closes.
[D] Choose Open Contact to open the selected contact and update the person’s information. Alternately, you can double-click the contact in the list.
See Entering Contact Information for a Person for help with updating a person’s contact information.
Why is InterAction for Microsoft Outlook Crossing Out the Contact's Information?
When you select a contact in the list of possible matches, you are indicating that the selected contact is the contact you are trying to create. After you select the contact, InterAction for Microsoft Outlook illustrates what information will be updated when you save the contact based on information you already have about the person.
For example:
- If you started from an email message on which the contact is included, you already have a valid email address for the contact. If the contact you selected in the list of matches has a different email address (or is missing an email address), InterAction for Microsoft Outlook updates the business email address with the version on the email message. (Alternately, you can save the email address as a Home or Other address.)
-
Note the Contact State in the ribbon of the New Contact page. If the state shown in the drop-down list (Shared with Firm or Not Shared with Firm) is different than the version on the matched contact, InterAction for Microsoft Outlook crosses out the old state and replaces it with the state shown in the ribbon. (You can update the contact state in the ribbon on this page.)
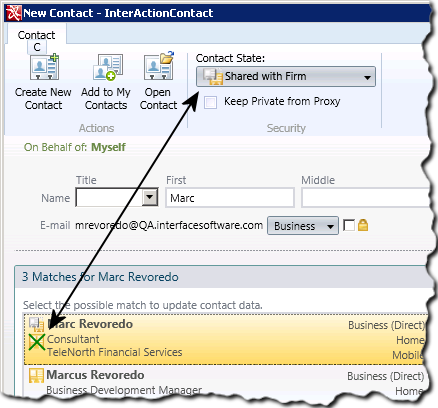
By replacing old values automatically, InterAction for Microsoft Outlook saves you time so you don’t have to manually enter the information. If the information is not correct (for example, you want to save a different business email address for the contact), choose Open Contact to view full contact details and make updates as needed.
Sharing Contacts and Keeping Contacts Private
When you create a new contact in Outlook, you choose whether to include it in your contact list only or share the contact with the firm. Setting this for each contact is important because it determines whether information updated by others in your organization is available for your contacts.
If you share a contact with the firm, both a user contact and firm contact are created and are connected. You have control over which specific fields should be contributed and which should be kept confidential. See Keeping Data Confidential for details.
When creating a new contact, choose Shared with Firm or Not Shared with Firm in the ribbon on the New Contact page to indicate whether the contact should be shared with other InterAction users at your organization.
If the contact is Not Shared with Firm, you can additionally select Keep Private from Proxy so only you can see the contact.
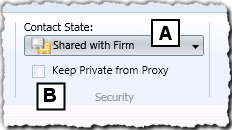
Contact Security Settings
[A] Choose whether the contact should be Shared with Firm or Not Shared with Firm.
[B] If you chose not to share the contact with the firm, you can also hide it from your proxy by selecting Keep Private from Proxy.
Entering Contact Information for a Person
When adding a new InterAction contact in Outlook, you are first given the opportunity to check for duplicates (see Checking for Duplicates). If you choose to create a new contact, InterAction displays the New Contact page (New Contact Page). Use this page to enter the person’s contact information.
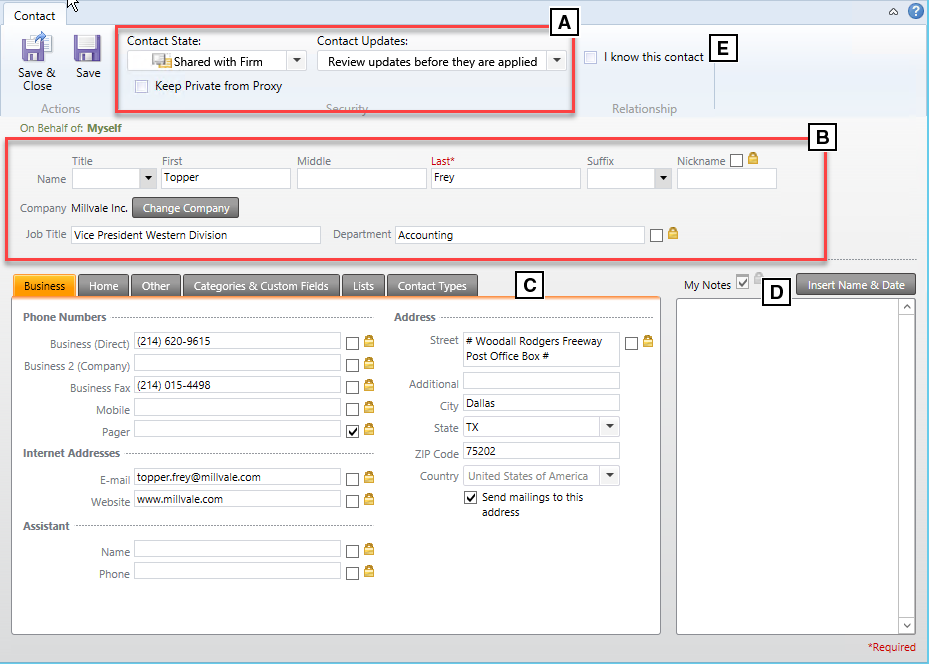
[A] The contact’s Security settings determine who can see the contact and how updates are handled. (The Contact Updates setting may not display, depending on your firm’s configuration.) See Security Settings.
[B] Enter contact’s name and company information. See Name Information and Linking a Contact to a Company.
[C] Use these fields to add phone, address, category, and custom field information for the contact. See Addresses and Phone Numbers and Categories and Custom Fields.
[D] My Notes lets you add notes to the contact. These notes are always locked and never shared with the firm. See My Notes.
[E] I know this contact checkbox. See "Specifying Relationships When Adding Contacts," below.
Specifying Relationships When Adding Contacts
If you share the new contact with the firm, you have an optional checkbox I Know this Contact which creates a Knows relationship. The checkbox is checked by default.
You can create a new contact, uncheck the checkbox and still create the contact. The link is optional.
IMO users [acting on behalf of myself] have the Knows relationship associated with themselves. Those acting as proxies for another [acting on behalf of ...] create the relationship between the new contact and that person.
Security Settings
Use the Security settings in the ribbon to specify who can see the contact, and whether you want to review updates to the contact.
NOTE Depending on the security settings defined by your firm, The Contact Updates field may not display.
-
In the Contact State field, choose Shared with Firm or Not Shared with Firm, then specify whether your proxy can see the contact.
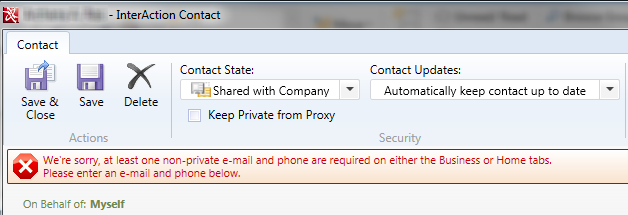
If you choose Shared with Firm, all required fields set by the firm must have data to share. If any of those fields have been set to Confidential, you will be prompted for that data (phone number, email address, or both).
See Sharing Contacts and Keeping Contacts Private for more information on these options.
-
In the Contact Updates field, indicate how you want to manage updates to the contact.
If... Select this option... You want to be notified when someone else changes the firm’s version of the contact Review updates before they are applied You want the contact to be kept up-to-date with information from others in your organization. Automatically keep contact up to date
Name Information
You can enter the following name information for your contacts:
NOTE The Last name field is required to save a new contact. However, it may not be sufficient to meet the requirements for a new contact. The firm’s requirements are configured in the Contact Control section of Data Minder. Last name is always required. An email address and a phone number may also be required.
-
Title
-
First, Middle, and Last Name
-
Suffix
-
Nickname
-
Company
-
Job Title
-
Department
If your organization tracks language-specific contact information, the Gender and Preferred Language fields also display. Your organization uses these fields to appropriately address the contact in his or her native language.
NOTE IMO displays the content for contacts so that it appears:
First Name + Last Name
Job Title (Department) at Company
Job title, department, and company affiliation are not required fields and may not be complete for all contacts. However, the more information for the contact, the better that InterAction and IMO can differentiate individuals and eliminate duplicates.
The Nickname and Department fields can be kept confidential by selecting the lock icons ( ). See Keeping Data Confidential for details.
NOTE Your organization may have specific standards for the data in the fields. Some of these standards can be addressed by data normalization. See the InterAction Data Minder Guide.
Keeping Data Confidential
For contacts shared with the firm, the contact’s Name, Job Title, and Company Name must be contributed to the Firm List and cannot be selected to be kept confidential. Name fields are used to identify the contact for duplicate checks, and the remaining fields are used to help identify the contact in searches.
When adding a contact to Outlook, the lock icons () indicate information that can be designated as confidential. To select the contact data that you wish to keep confidential, choose the check box next to the lock icon. The example below shows the Mobile field as confidential.
When creating a new contact in IMO, the required fields configured by the firm determine whether contacts will be added to InterAction. When creating a new user contact, fields marked as confidential do count as valid for the required fields. When creating a new firm contact, including sharing a user contact with the firm, the fields marked as confidential do not count towards the required fields.

InterAction for Microsoft Outlook lets you configure which contact fields you want to set as confidential each time you add a contact. This saves you time so you don’t have to check the lock boxes each time. See New Contact Settings for more information.
Linking a Contact to a Company
Linking a contact to a company associates the contact with a company contact. This allows you to then share any of the company’s phones and addresses for the person.
If the company’s phone and address information changes, the change is reflected in all person contacts associated with the company. Company association saves time and ensures accurate and consistent information throughout the system.
To associate a person contact with a company, choose Link to Company.
NOTE If the contact is already associated to a company, the Link to Company button reads Change Company. See Changing a Contact's Employment.
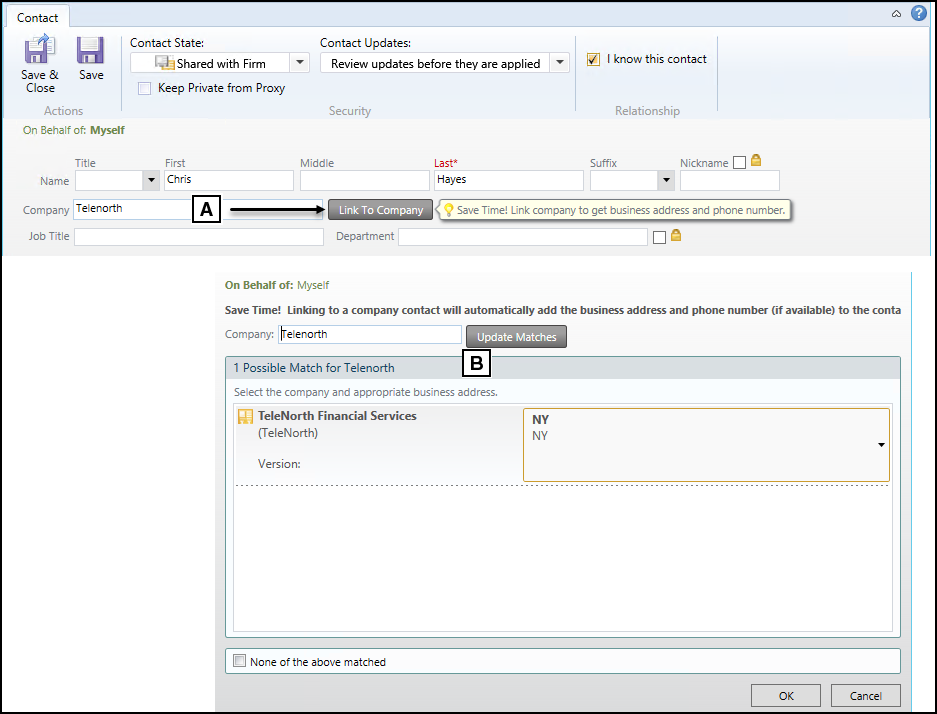
Linking a Contact to a Company
[A] Choose Link to Company to associate the contact with a company.
[B] If you typed text in the Company field before choosing Link to Company, InterAction for Microsoft Outlook immediately checks for matching companies. Otherwise, type a company name in the Link to Company page then choose Update Matches.
If the Company Already Exists in InterAction for Microsoft Outlook
If you find the correct company in the list of possible matches:
-
Select the company in the list.
-
If the company has multiple office locations, choose the contact’s office location in the drop-down list.
-
Choose OK.

Selecting a Company Location
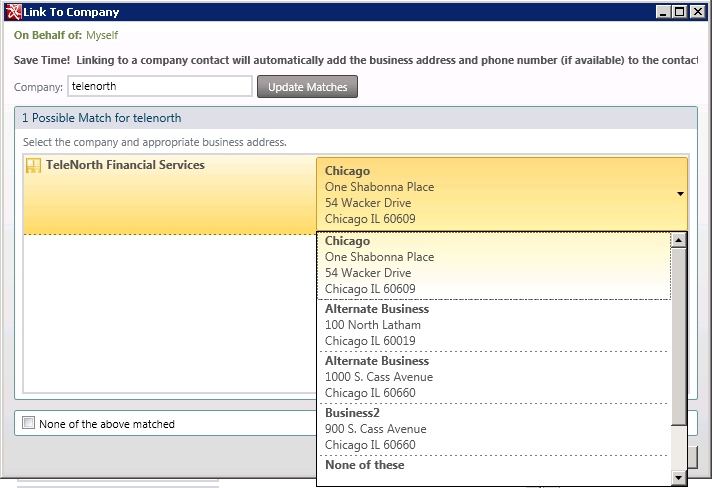
If the company has addresses and phone numbers on record, the contact is updated with the information.
Addresses and Phone Numbers
Use the Business, Home, and Other tabs at the bottom of the New Contact page to add a contact’s phone numbers and addresses.
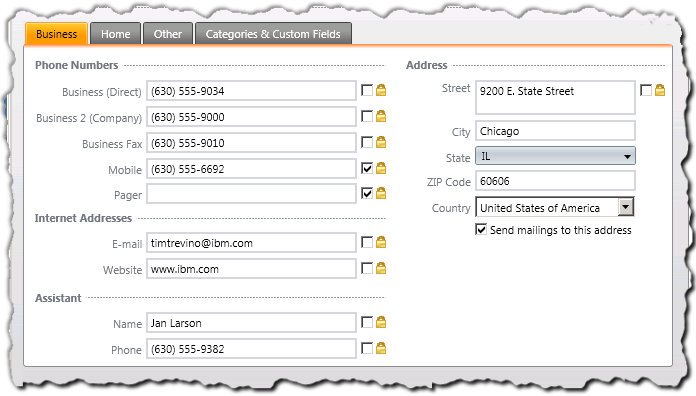
Addresses and Phone Numbers
The lock box icons() make individual fields confidential so they are not shared with the firm. See Keeping Data Confidential for more information.
Required fields are indicated by asterisks in the interface. If a phone number or email address is required, the asterisk appears next to all of those fields on the Business and Home tabs. For phone numbers, the system looks in Business, Business2, Mobile, and Home fields. For email addresses, the system looks in Business Email and Home Email.
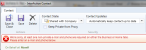
The IMO interface may prompt for appropriate data in required fields:
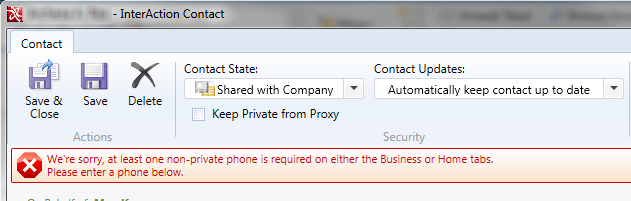
Choose Save or Save & Close to save your changes to the contact.
Categories and Custom Fields
When adding a new contact to Outlook, categories and custom fields can be applied in the Categories & Custom Fields tab.
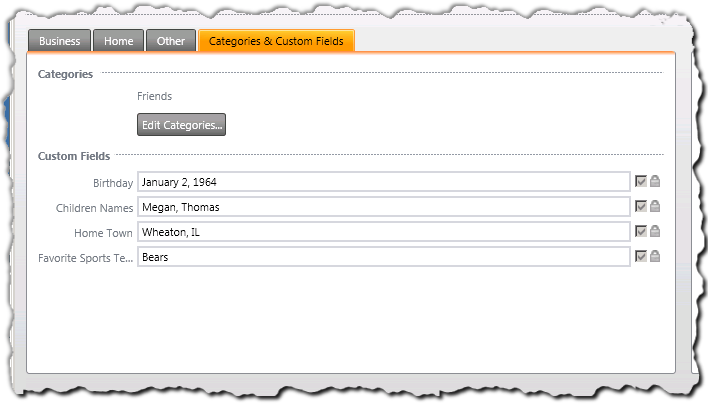
Categories and Custom Fields
After making updates in this tab, choose Save or Save & Close to save your changes to the contact.
Categories
Categories help you find, sort, filter, or group contacts. They work like personal lists. For example, you may create “Family” and “Friends” categories and assign contacts to those categories. These can help you filter personal from professional contacts.
To add a category to a contact, choose Add Categories. If a contact already has categories assigned, choose Edit Categories to add or remove categories from the contact.
To create a new category that does not already exist:
-
Choose Add Categories or Edit Categories.
-
Choose New.
-
Type a category name then choose OK.
Custom Fields
InterAction offers four custom fields to label whatever you wish to help you store additional contact information. For example, you may want to add information that helps you remember information about a contact, such as his or her birthday, favorite sports team, home town, names of family members, etc.
NOTE Custom Fields are set up in InterAction for Microsoft Outlook Settings or My InterAction in the InterAction Web Client. See Manage Contact List for more information.
To enter a value for a custom field, type in the text box for the field.
My Notes
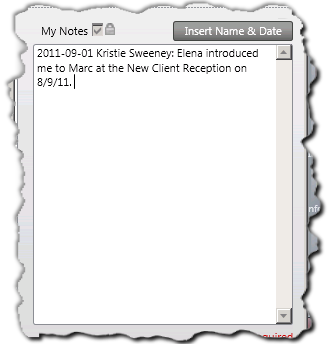
InterAction for Microsoft Outlook lets you store free-form text notes about a contact. These notes can only be seen by you; they are not shared with the firm.
To add notes while adding a contact, begin typing in the notes field (Notes Regarding a Contact). Choose Insert Name & Date to have this information inserted for you at the cursor point. Notes can include links to web pages; InterAction will open the link in the default browser.